


Portrait Lighting Styles
In this blog post, we will look at four common lighting setups for portraiture (as well as one not so common lighting setup) that you can add to your repertoire, to help you create amazing, dynamic portraits. All the examples shown involve using one off-camera light source (for simplicity), however, there is nothing to stop you from adding more lights or reflectors into the mix to fill in shadows or just be adventurous with your studio lighting.
Whether you are using continuous light or flash, hard light or soft light, the basic light patterns produced will remain the same. The hardness or softness of the light will only affect how subtle, or how dramatic the contrast is between light and shadow. Now that has all been covered, let’s get started with our first portrait lighting set-up.
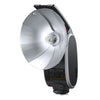
NOTE: All of the following examples with the mannequin, were taken with a hard light source to make the light pattern more obvious. However, so long as the lights are positioned in the same place in relation to your subject, the light pattern will remain the same regardless of whether you're using a hard or soft light source (the effect from a soft light source will just be more subtle and will transition from light to shadows more gradually).
Rembrandt Lighting


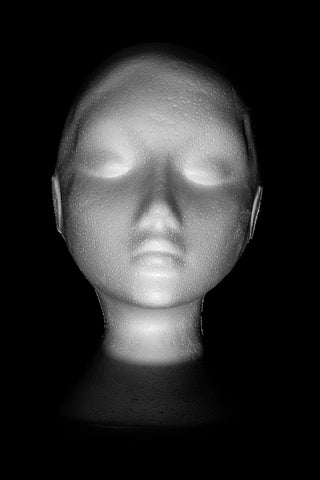
Rembrandt lighting is named after the famous 17th Century Dutch Painter Rembrandt van Rijn. He often painted his subjects illuminated by high windows, which produced a distinctive triangle of light on the cheek of his subjects on the shadow side of their face.
To create Rembrandt lighting, place your light at an angle of roughly 45 degrees from your subject’s face, and raise it up so it points down towards your subject’s face at an angle of roughly 45 degrees also. Since everybody’s face is slightly different, you may have to play with the position of the light a bit until you get that distinctive triangle of light on your subject’s cheek.
Rembrandt lighting is a flattering style of light that works well on virtually any subject, regardless of whether they’re male or female. This lighting style is great for creating either classically styled portraits or dramatic portraits. If you want to create more dramatic portraits using Rembrandt lighting, we recommend using a harder light source to produce more dramatic shadows.

One of Rembrandt's many paintings depicting the signature "Triangle of light" on his subject's cheek on the shadow side of the face.
Loop Lighting


Loop lighting is very similar to Rembrandt lighting, however, the shadow from the nose doesn’t quite meet with the shadow from the cheek as it does in Rembrandt lighting (which forms Rembrandt-Styled triangle of light on the cheek). Instead, the shadow from the nose produces a small loop (hence the name Loop lighting).
To create Loop lighting, position your key-light between 30-45 degrees in relation to your subject’s face, and raise your light to just above your subject’s eye level (ensure that the shadow from the nose, doesn’t meet with the shadow from their cheek otherwise you’ll have Rembrandt lighting).
Just like Rembrandt lighting, Loop lighting is a flattering style of light that works well on virtually any subject, regardless of whether they’re male or female.
Butterfly/Paramount Lighting


Butterfly lighting (also known as Paramount lighting), is created by positioning your light source directly centred and above your subject’s face. This creates a shadow under the nose which resemble a butterfly (hence the name butterfly lighting). The reason it is sometimes known as “Paramount Lighting” is that this was the style of lighting that was often used by the Paramount movie studio to photograph their leading actresses back in the early days of Hollywood.
Butterfly lighting is more typically used for photographing women as it can accentuate cheekbones and will de-emphasise any wrinkles they may have (which your subject will thank you for). However, please be aware that if your subject has deep-set eyes, positioning your lights too high could result in no light in your subject’s eyes which can result in a creepy looking portrait (which in most cases, your subject won’t thank you for).

A photo of actress Gene Tierney, taken back in the early 1940s using the classic Paramount (Butterfly) lighting setup.
Split Lighting


As the name implies, Split lighting (also known as Side-lighting) literally divides your subject’s face in two with light and shadow (one half is illuminated, and the other half falls into shadow). This style of lighting is great for creating dramatic, or mysterious portraits. This is a common style of lighting used in photographing people in the arts, such as musicians, magicians and artists etc.
To create Split lighting, simply place your light at an angle of roughly 90 degrees from your subject’s face. Everybody’s face is slightly different, so you may have to adjust the position of your lighting (or the direction of your subject’s face accordingly. Remember, if your subject turns their head, the light pattern on their face will change, so if you want to maintain the “Split Lighting “look, then you will have to adjust the position of your lights too.
Split lighting is more commonly used for photographing men than it is for photographing women. However, don’t let that stop you from using this style of lighting with a female subject as there are no hard and fast rules, so long as you use it in the appropriate situation. For example, if your aim is to create a beauty portrait, then this style of lighting isn’t really going to be appropriate. If you are going for a mysterious or dramatic look on the other hand, then this is the perfect set-up to go for.
Under Lighting/Monster Lighting (Bonus)


Under lighting (or Monster Lighting), is a type of lighting that you should avoid at all costs unless you are trying to create a sinister or horror-styled image (which is why it is also known as Monster Lighting). Our brains are accustomed to seeing objects being lit from above (as that’s where the Sun is positioned in relation to us). Anything lit from underneath looks weird and unnatural to us, which is why this style of lighting is commonly used by cinematographers working in the horror genre.
Whilst you would not typically use this type of lighting to photograph a wedding or for a portrait session with grandma and the kids, it can be great for photographing actors who work within the Horror genre, or members of certain types of rock or metal bands etc.
Conclusion
Those are the four main lighting patterns traditionally used in portrait photography, though by no means are you limited to those set-ups. If you are starting out, we recommend familiarising yourself with these set-ups first (well, not so much the monster lighting setup) and then experiment with other setups once you become more confident in creating the basic setups.
All the above setups were done using one light for simplicity, however, there is nothing to stop you from adding more lights or reflectors into the mix, to be used as either fill lights, hair lights and rim lights etc. So long as your Key-light is positioned in the as mentioned above, the light patterns will still remain true.
Now that you're armed with this new knowledge you are now free to go out there and produce amazing portraits. Remember, the art of portrait photography lighting requires practice, so we recommend finding a patient model (a mannequin can also be a good choice) to hone your skills and experiment with. Once you have mastered these setups, you will never look back.